
9 February 2014
Setting a fence post that stays where you put it
Filed under Outdoors
A fence post fails at ground level, almost without exception. It does not rot at the bottom, where people expect it to, and it rarely snaps in the middle. It goes where air and water meet the timber together, in the band just above and just below the surface, and everything about setting a post well is really about managing water at that band.
Depth and width
The hole needs to be deep enough that a meaningful proportion of the post is below ground, and deeper still for a gate post or the end of a run, which carry loads the intermediate posts do not. In ground that freezes, the base of the hole needs to sit below the depth that frost reaches locally, or the whole post will be lifted and dropped each season until it is loose.
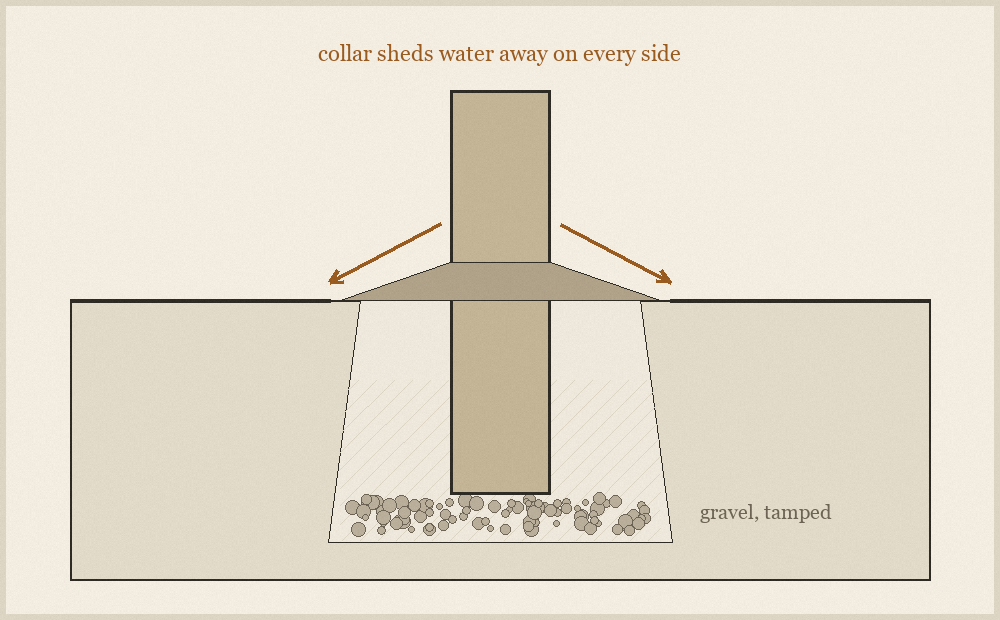
Width matters less than people think, but the shape does: a hole that is slightly wider at the bottom than the top resists being levered out, whereas a hole that tapers the other way is a socket the post can rise from.
Drainage at the base
Put a layer of coarse gravel in the bottom and tamp it, then stand the post on that rather than on bare soil. The gravel gives water somewhere to go instead of sitting against the end grain, and end grain is where timber drinks fastest. Setting a post in a sealed cup of concrete with no drainage does the opposite: it holds a reservoir against the one part of the post least able to resist it.
Backfilling
Whether you backfill with compacted material or with concrete, do it in layers and consolidate each layer before adding the next. A hole filled in one go has voids in it, and voids let the post work loose under wind load long before anything rots. Brace the post in two directions while you work and check plumb after every layer, not once at the end, because a post that is plumb when you start will have moved by the time the hole is full.
Check plumb on two adjacent faces, not one, and sight along the run as well. A post that is individually plumb but out of line with its neighbours makes every rail fixing awkward and the whole fence looks wrong from a distance, which is the only place a fence is ever looked at.
The collar is the whole job
Finish the fill so it stands slightly proud of the surrounding ground and slopes away from the post on every side. That collar sheds rain away from the critical band instead of collecting it. A backfill that finishes dished, or flush and flat, forms a small pond around the post after every shower, and that pond is what shortens the life of the fence by years.
Keep soil, bark and planting off the post afterwards for the same reason. A border built up against a fence post keeps the timber permanently damp, and the post will fail at the new ground level rather than the old one.