Shim mark: a pair of opposing wedges

Sawdust and Shims

A working journal of small repairs, paint and trim, written a job at a time.

Cutting a clean line where wall meets ceiling
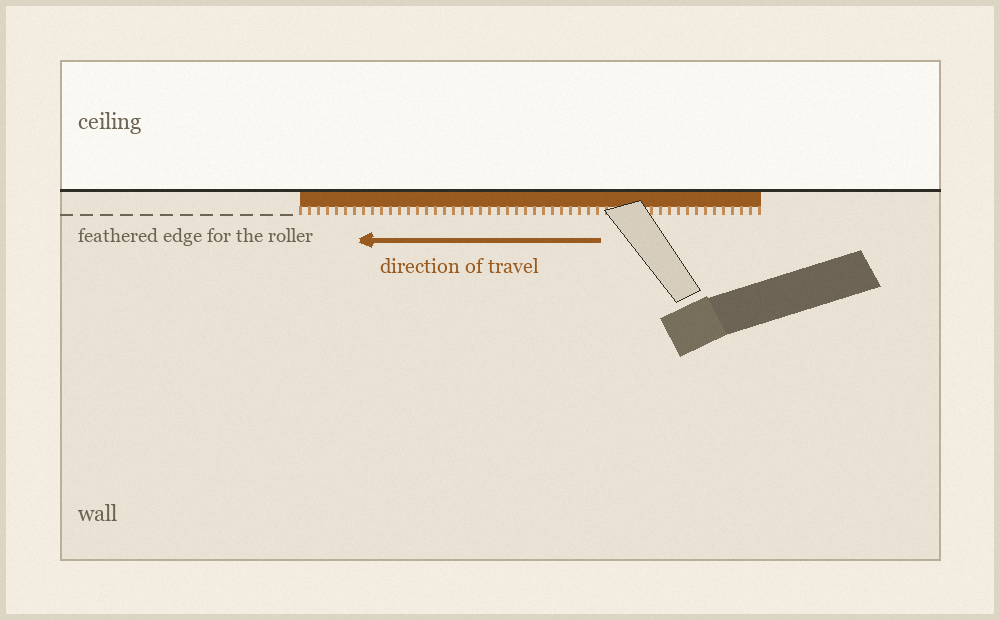
Diagram of a paint brush held flat against a wall just below the ceiling line, showing the bead of paint running ahead of the bristle tips.
A loaded brush held flat to the wall, with the ferrule kept off the ceiling line.

Filed under Paint and Finishes

Cutting in is the part of painting that decides whether a room looks finished or looks attempted. Everything else is coverage. The line where the wall stops and the ceiling begins is at eye level for the whole life of the room, and a wobble there is the first thing a visitor's eye lands on, long before anyone notices that the roller left a light patch behind the door.

The mistake almost everyone makes at the start is to work with a nearly dry brush, on the theory that less paint means less risk. It is the opposite. A dry brush has to be pressed into the wall to leave anything behind, and pressing splays the bristles sideways in a way you cannot control. A properly loaded brush leaves a bead of paint that runs slightly ahead of the bristle tips, and that bead is what actually draws the line. Your job is to steer it.

Dip about a third of the bristle length, no more, and tap each side against the inside of the tin rather than dragging the brush across the rim. Dragging strips the paint off one face and leaves the brush lopsided, so the bead forms on one corner instead of across the tip. Tapping keeps the load even and still knocks off the drip that would otherwise land on the floor on the way to the wall.

Use an angled brush and hold it like a pencil rather than like a hammer. The grip matters because the movement comes from the whole arm, not from the wrist. A wrist pivots, and a pivot draws an arc; the ceiling line is straight. Lock the wrist, plant the heel of your hand or a knuckle lightly against the wall as a running guide, and move from the shoulder.
Read the rest of this entry

Earlier entries

What a shim actually does, and why you need more than one

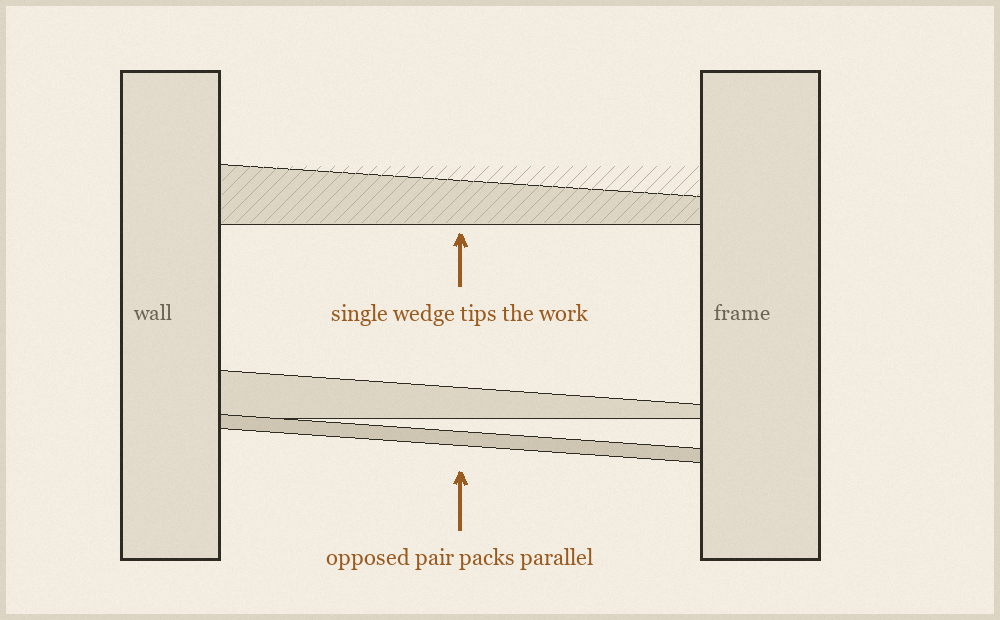
Diagram of two tapered wooden shims overlapped in opposite directions between a door frame and a wall, forming a flat packing block.
Two tapered shims driven from opposite sides, making a parallel-sided packer of adjustable thickness.

Filed under Tools and Materials

A shim is a thin tapered wedge, and on its own it is nearly useless for the job most people try to do with it. Driven into a gap alone, a single shim does not fill the gap; it fills a triangle. Whatever it is holding ends up tipped by exactly the angle of the taper, which is why a door hung on single shims swings shut on its own and a shelf packed with one sits proud at the front.

Used in pairs, the same wedge becomes something else entirely. Slide one in from the left and one in from the right, overlapping, and the two tapers cancel: the sandwich has parallel faces, and its thickness is adjustable by sliding the pair against each other. That is the whole trick, and it is the reason shims come in packets rather than singly.

Read the rest of this entry

Reading a stud finder that keeps lying to you

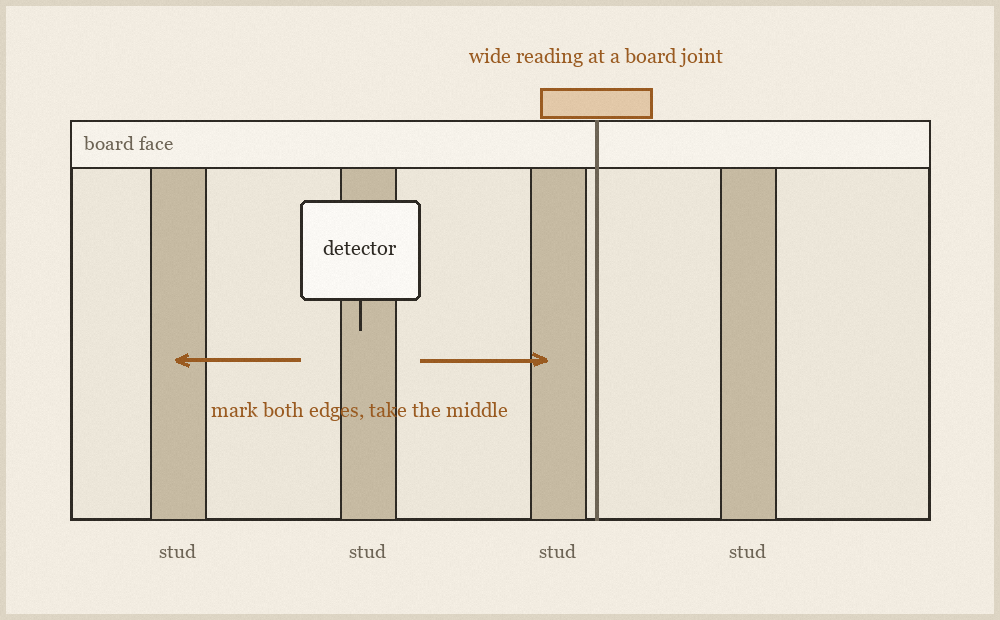
Cutaway diagram of a stud wall showing plasterboard over vertical timber studs, with a wide shaded band marking where a density detector reads a false positive at a board joint.
A wall section showing board, framing and the wider signal a detector reads at a joint.

Filed under Walls and Trim

A density stud finder does not find timber. It finds a change in how much material sits behind the surface, and then reports that change as an edge. Most of the time the change is a stud. Sometimes it is a board joint, a run of tape and compound, a pipe, a cable, an old repair, or a second layer of board that stops halfway across the room. The tool is not lying so much as answering a narrower question than the one you asked.

Every detector of this type sets its baseline when you first press it to the wall, which means pressing it directly over a stud teaches it that a stud is normal, and it will then happily tell you the whole wall is solid. Start in the middle of a bay, well away from corners and openings, hold still for the calibration, and only then begin to move.

Read the rest of this entry

Patching a doorknob hole so the repair disappears

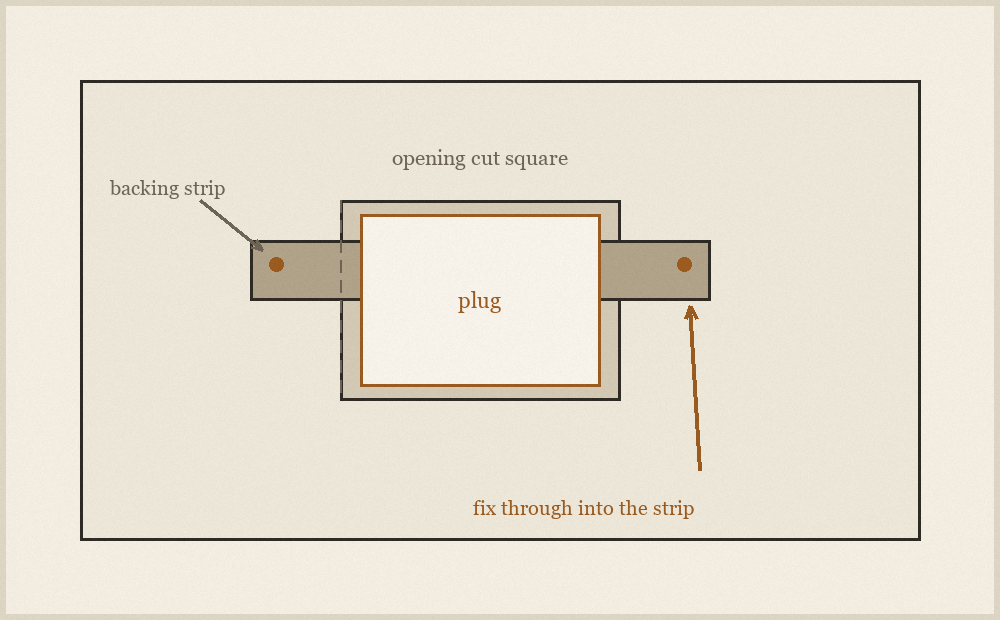
Diagram of a rectangular hole cut in plasterboard with a timber backing strip inside the cavity, held against the back of the board while a plug is fitted into the opening.
A backing strip fed into the cavity and drawn tight while the adhesive sets.

Filed under Walls and Trim

The hole a door handle punches into a wall is small, round and deep, and it is the most commonly botched repair in a house. Filler alone will not hold, because there is nothing behind it: the compound sags into the cavity as it dries and leaves a dimple that catches light from the side forever after. The repair needs something to bear against before it needs anything to smooth over.

Cut the ragged circle out into a clean rectangle. It feels wrong to make the damage bigger, but a rectangle can be measured, and a patch cut to a measured rectangle sits flush with even gaps all round. A circle cut by an impact has torn paper edges that will never take compound cleanly. Keep the offcut square and true, and cut with the blade tilted very slightly so the opening is fractionally wider at the back than the front.

Read the rest of this entry

Choosing a sheen before choosing a colour

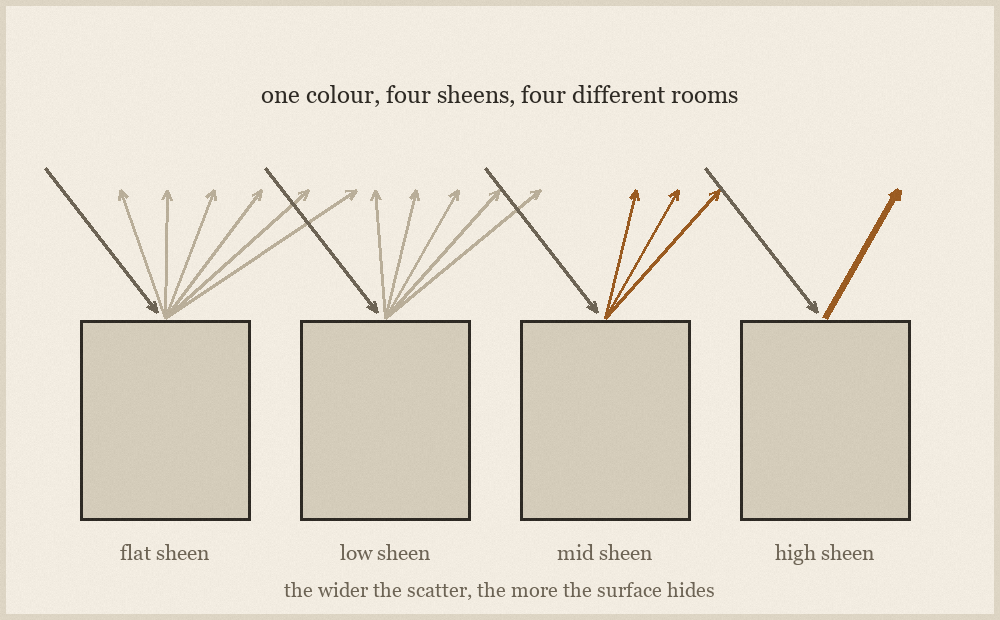
Diagram comparing four painted panels of the same colour at flat, low, mid and high sheen, with arrows showing how much light each reflects toward the viewer.
The same colour at four sheen levels, showing how reflected light changes what the eye reads.

Filed under Paint and Finishes

People choose colour for weeks and sheen in the last thirty seconds at the counter, and then wonder why the finished room does not look like the sample card. Sheen changes how much light bounces back at you, and light bouncing back at you is most of what you perceive as colour. The same tin, applied flat and applied at a higher sheen, will read as two different colours on two walls of one room.

A flat finish scatters light in every direction. That is why it hides surface irregularity so well: no single direction gets a concentrated reflection, so a slightly wavy wall reads as even. A higher sheen reflects more light coherently, so the wall returns a bright image of whatever is opposite it, and every hollow and ridge shows up as a distortion in that image.

Read the rest of this entry

Scribing a baseboard to a floor that is not flat

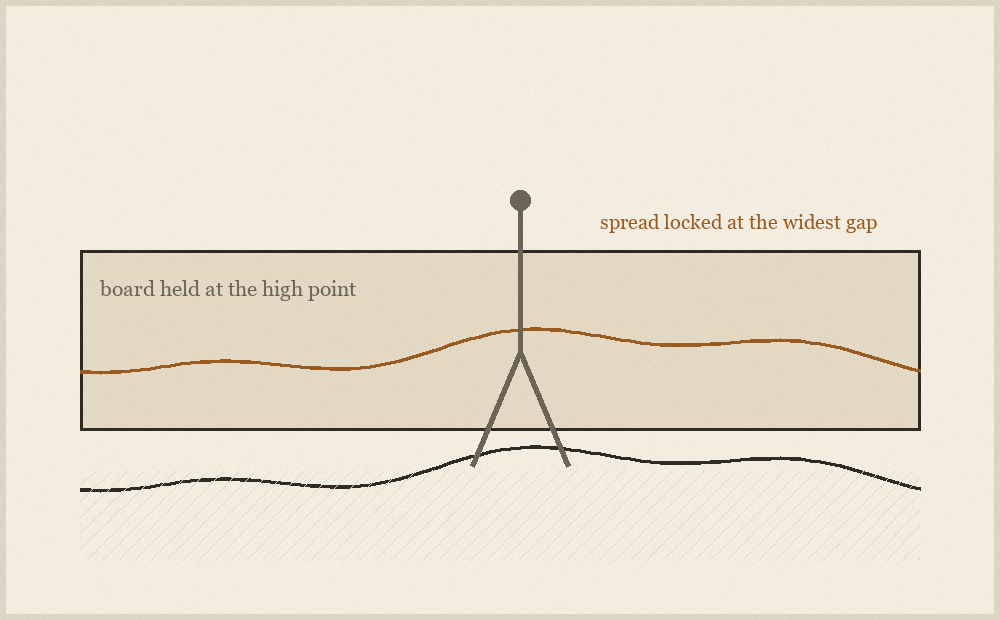
Diagram of a compass with one leg on an uneven floor and the other marking a matching line along the face of a length of skirting board held against the wall.
Compass legs held at a fixed spread, tracing the floor contour onto the face of the board.

Filed under Walls and Trim

A board cut square meets a floor that is not, and the result is a wandering gap that no amount of filler makes honest. Scribing solves it by transferring the actual shape of the floor onto the board, so the cut follows the contour instead of ignoring it. It is one of the few genuinely old techniques that nothing has improved on.

Before anything is marked, run a long straightedge along the floor where the board will sit and find the highest point. That point sets the height of the whole board, because a board can be cut away to meet a low spot but cannot be stretched to meet a high one. Rest the board on that high point, hold it level, and note how far the largest gap is elsewhere along the run.

Read the rest of this entry

Undercutting door casing before the floor goes down

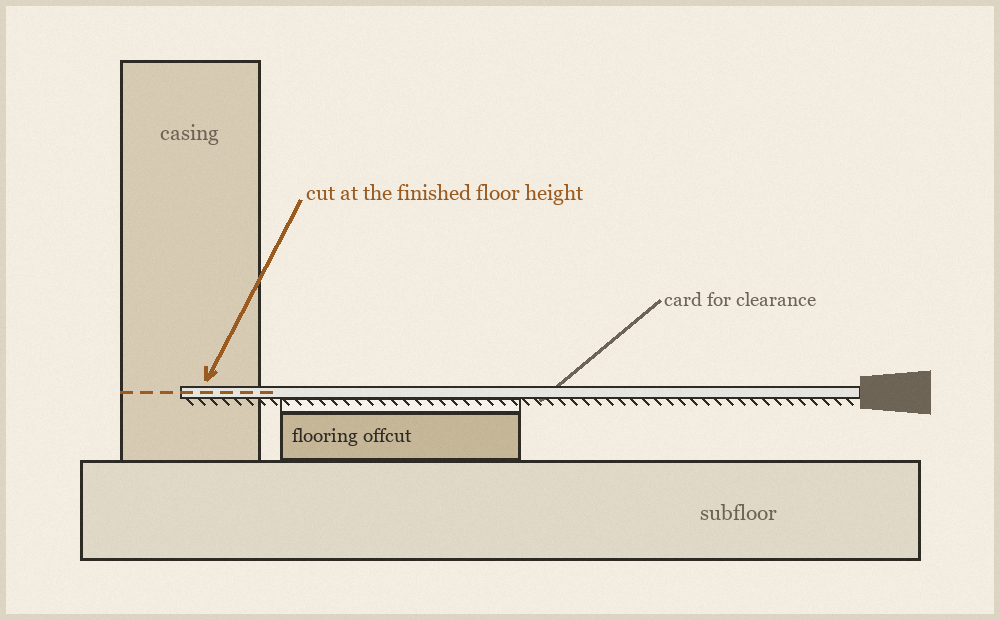
Diagram of a flush-cutting saw resting on an offcut of flooring beside a door casing, showing the cut line set at the height of the finished floor.
An offcut of the new floor used as a height gauge for the saw.

Filed under Floors

There are two ways to get a new floor past a door casing. You can cut the floor around the shape of the casing, or you can cut the casing and slide the floor underneath. The second is faster, more forgiving and looks better, and the only reason it is not universal is that it has to be done before the floor is laid, when the temptation is to get boards down and worry about details later.

Take an offcut of the actual floor you are laying and add whatever underlay or adhesive bed goes beneath it. Lay that stack on the subfloor against the casing: the top of it is the exact height the cut must clear. Guessing this from a measurement is how people end up with a casing cut a fraction low, which is unfixable without replacing the casing.

Read the rest of this entry

All entries in the journal

Labels

  • Paint and Finishes (4)Brushwork, sheen, sanding between coats and the things that go wrong on the second pass.
  • Walls and Trim (3)Plaster and board repairs, finding what is behind the surface, and fitting trim to rooms that are out of true.
  • Floors (3)Boards, thresholds, squeaks and the preparation that decides how a floor behaves later.
  • Tools and Materials (3)What a tool is actually for, what a first kit needs, and keeping an edge worth using.
  • Outdoors (1)Work that has to survive weather, frost and ground that moves.