
21 June 2015
Patching a doorknob hole so the repair disappears
Filed under Walls and Trim
The hole a door handle punches into a wall is small, round and deep, and it is the most commonly botched repair in a house. Filler alone will not hold, because there is nothing behind it: the compound sags into the cavity as it dries and leaves a dimple that catches light from the side forever after. The repair needs something to bear against before it needs anything to smooth over.
Square it up first
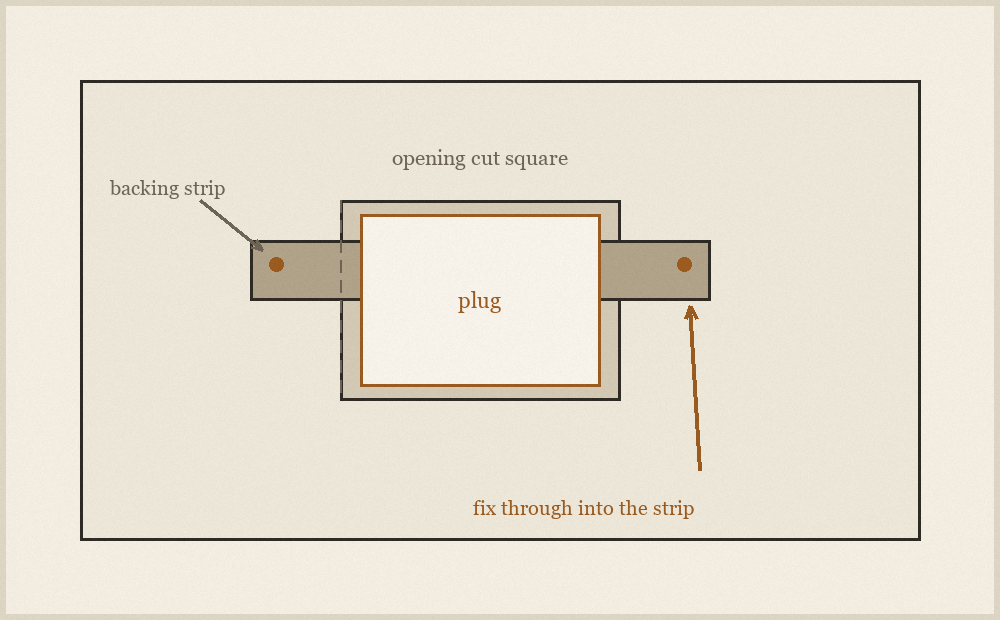
Cut the ragged circle out into a clean rectangle. It feels wrong to make the damage bigger, but a rectangle can be measured, and a patch cut to a measured rectangle sits flush with even gaps all round. A circle cut by an impact has torn paper edges that will never take compound cleanly. Keep the offcut square and true, and cut with the blade tilted very slightly so the opening is fractionally wider at the back than the front.
Give it a back
Cut a strip of scrap timber or offcut board longer than the opening in one direction and feed it into the cavity so it bridges the hole behind the wall surface. Hold it against the back of the board and fix through the face into the strip at each end, outside the opening. Now there is something solid behind the patch, and the patch can be pressed flush without disappearing into the wall.
Cut the plug to fit the opening with a whisker of clearance rather than forcing it, fix it to the backing strip, and check with a straightedge that it sits fractionally below the face of the surrounding wall rather than proud. Slightly low can be filled. Proud can only be sanded, and sanding a patch means sanding the paper of the wall around it, which raises fuzz that shows through paint.
Tape, then three thin coats
Bed tape over every joint of the patch in a thin bed of compound and squeeze the excess out from under it with the knife. Any compound left under the tape is a lump you cannot sand away without cutting into the tape itself.
Then build up in three thin coats with a progressively wider knife, letting each dry fully. The first coat covers the tape, the second widens the transition, and the third feathers it out far enough that the eye cannot find a boundary. Every coat should be wider than the one below it. Trying to do it in one thick coat gives a repair that dries with a hump and cracks along the tape edge.
Finishing
Sand with a light touch and a flat block, not fingers, and check the result by holding a lamp almost flat against the wall so the light rakes across it. Raking light shows every high and low spot that straight-on light hides, and it is the same light the room will eventually show it in on a sunny afternoon.
Prime the patch before painting. Bare compound and painted wall absorb paint at different rates, and without primer the patch will read as a matt island in a sheen wall even when the colour is a perfect match. Then fit a stop behind the door, or the same handle will make the same hole again.